学习链接:https://www.liaoxuefeng.com/wiki/1016959663602400
参考链接:https://docs.python.org/zh-cn/3.7/tutorial/index.html
Google 开源项目风格指南:https://zh-google-styleguide.readthedocs.io/en/latest/google-python-styleguide/contents/
比较基础的部分,新的东西就记一笔过一下就行了,方便以后查阅。
由于讲的偏系统,而不是深入浅出,比如一上来就把所有的东西讲完,也不说清哪些常用哪些不常用,其实不是很适合新手学习。
学起来才会感觉到,C++ 从会用到入门以后,学其他语言也不会只关心它的语法,还会去查它的实现,如 Python list 的实现,int 的上限(不存在的)。
基础语法
语句没有分号。
逗号不是用于分隔表达式,而是用于对多元组赋值:
1 | a, b = b, a+b |
代码块不用大括号,完全靠缩进(约定俗成为 4 个空格)
注释用 # 号开头(和 shell 是一样的)
执行 python 脚本
用 python 运行
1 | python test.py |
直接运行
Windows 下不行,只能 Linux 或 MacOS X。
- 在脚本开头加:
1 | #!/usr/bin/env python3 |
- 通过命令给脚本权限
1 | chmod a+x hello.py |
基本 IO
输出:print()
1 | print("Hello world") # 自带换行 |
Python 也支持类似与 C 的格式化方式,但这部分内容属于字符串。
输入:input()
1 | name = input() # 输入的是 str 而非 int |
读文本文件
1 | with open('input.txt', 'r') as f: |
如需读写 utf-8 文档,可在 open() 函数添加参数 encoding='utf-8'。
如需跳过第一行,可以使用以下语法:
1 | with open('input.txt', 'r') as f: |
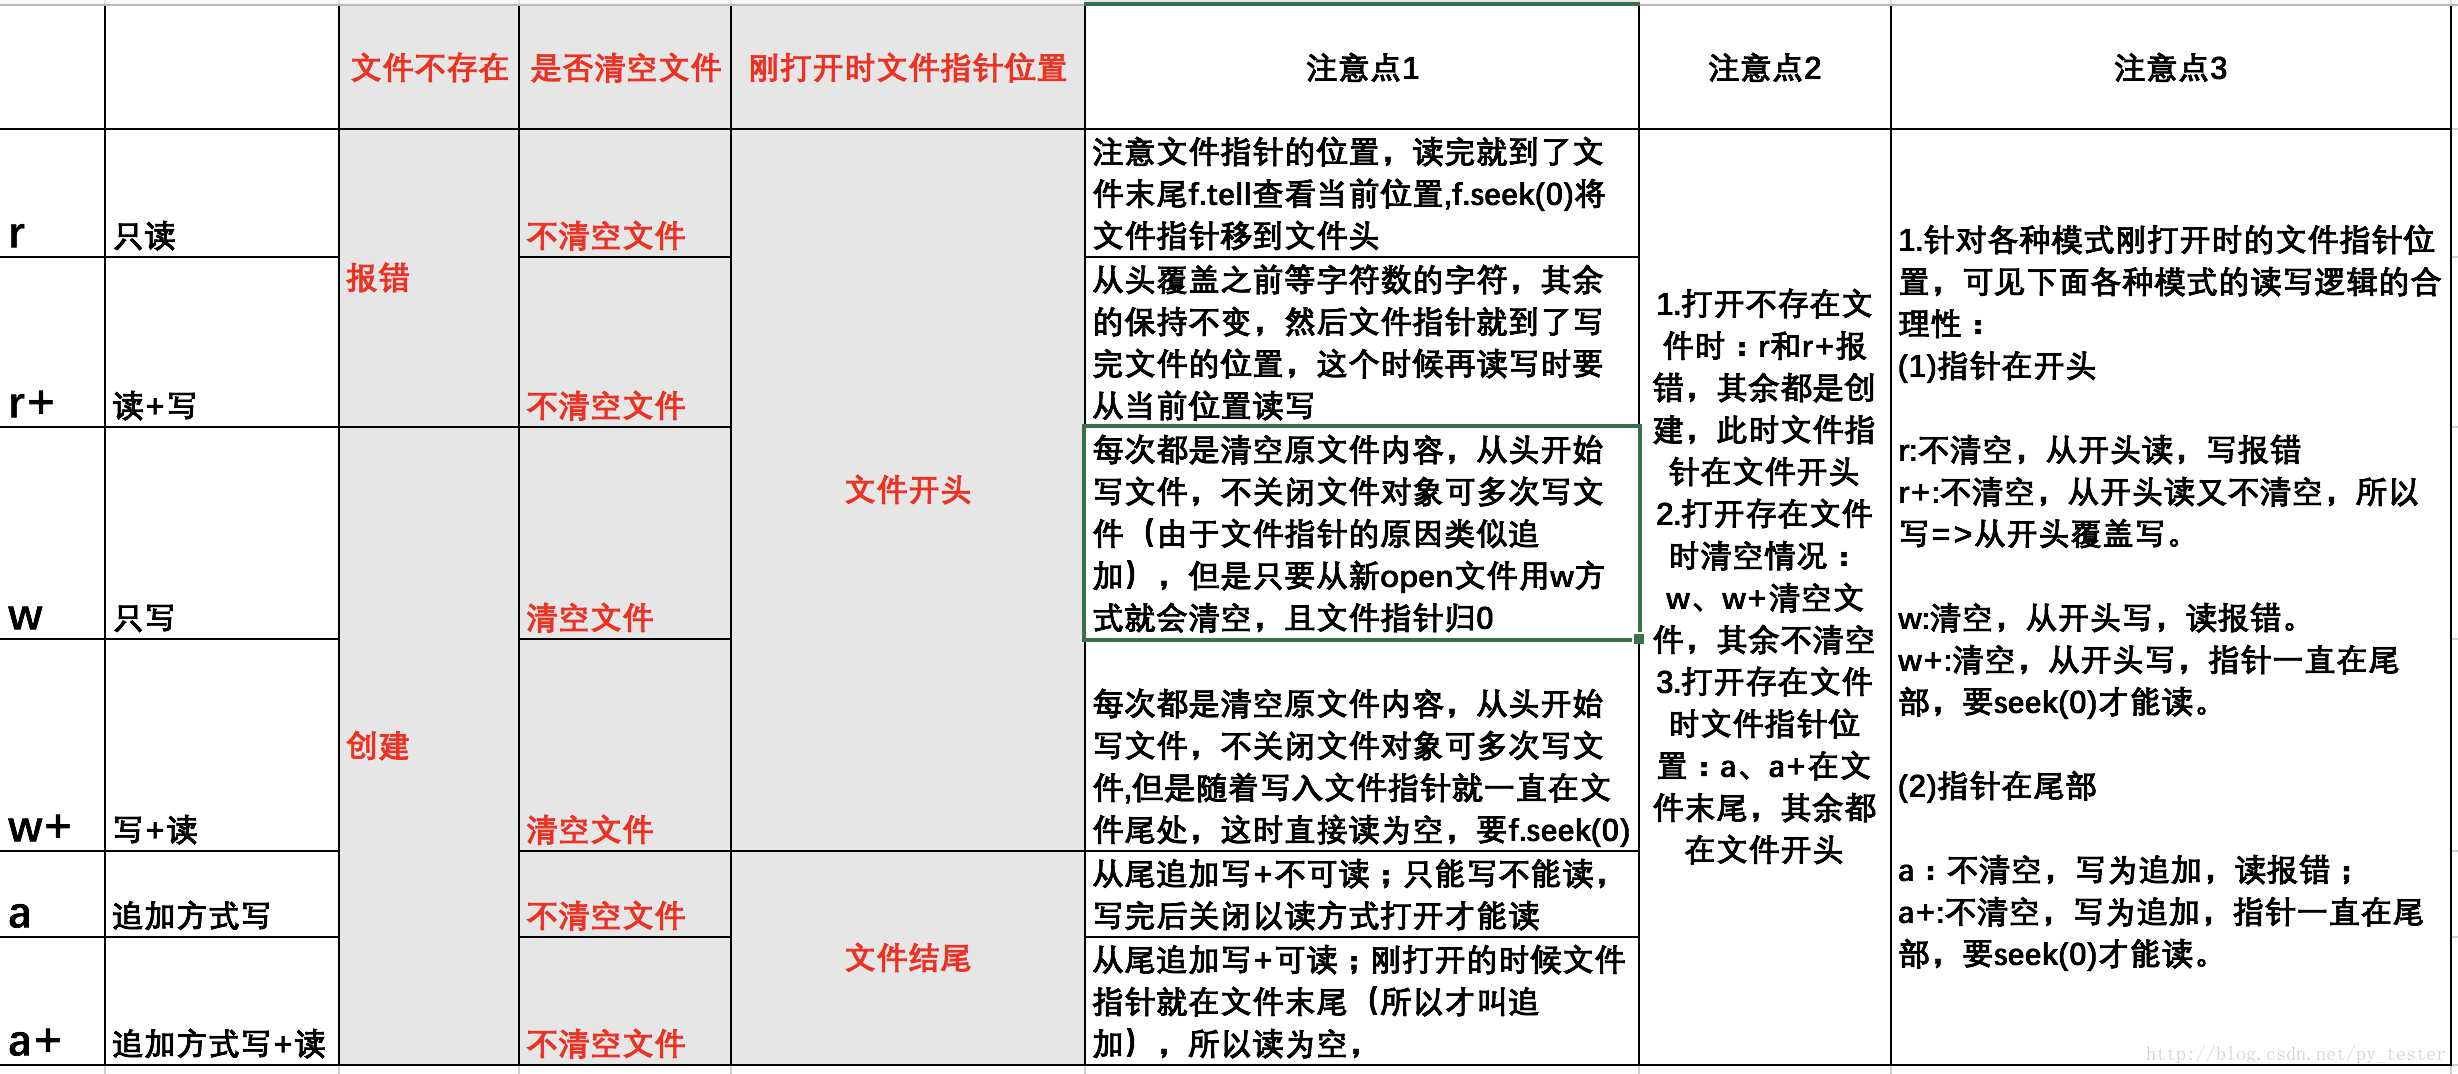
写文本文件
1 | with open('output.txt', 'w') as f: |
关于写入、追加等方式的区别可见图(来源):
基本数据类型
有整数 int,浮点数、字符串 str、字节串 bytes 布尔值 bool、空值 None。
整数的上限
知道怎么移位以后,我就尝试用 (-1)>>1 得知 Python 的上限。然而失败了。结果是 -1 是个什么意思?!
查了一下资料,发现 Python 整型是没有上限的?!因为它的实现是类似于高精度的变长数组(牺牲效率获取方便,没毛病)
那这个大概负数移位以后,自动把空出来的符号位又用 1 补上了。最后的结果就是,无论正负数,右移的结果是向下取整。
实数间的除法
Python 的 / 的结果是浮点数。
Python 的 // 和 % 是广义的整除和取模,可以在浮点数间使用。
字符串
字符串可以理解为字符的 list,可以直接使用 list 的成员函数。
字符串常量
- 单双引号等价:
"a"=='a'(Python 没有char的说法,只有one-character string) - 支持转义字符
\:"'"=="\'"=='\'','\n' - 类似于 C++ 的逐字字符串:
r'\n'==r'''\n''' - 还可以用
'''括起表示换行的字符串(该语法支持与第三条搭配):
1 | print('''hello |
在命令行中使用该语法会出现用 ... 代替 >>> 的提示符,如下:
1 | print('''hello |
字节串 bytes
字符编码原理可以看这篇博客。
在 Python 3 中,字符串用 Unicode 编码。在内存中使用 Unicode,但是如果需要保存在磁盘上,就需要把 str 变为 bytes。
bytes 常量须在单/双引号前加前缀 b,如 b'ABC'。
Unicode(str)和 bytes 的转换
Python 的 str 使用 Unicode 的,而若要用 ASCII 或 UTF-8 (如在网络或磁盘上存、取),就得使用 bytes。
str 可以通过成员函数 encode() 编码为指定编码(如'ascii','utf-8')的 bytes。
1 | > 'ABC'.encode('ascii'); |
中文编码为 ascii 会报错。而 utf-8 中无法显示为 ASCII 字符的字节,会用 \x## 显示。
为避免乱码,应当坚持使用 UTF-8 对 str 和 bytes 进行转换。
而反过来,把指定编码的字节串编码为 Unicode 的函数叫 decode()。
1 | > b'ABC'.decode('ascii') |
解码过程中可以传入 errors='ignore' 忽略错误的字节。
字符串、字节串的长度
对于字符串,len() 能返回字符数;对于字节串,len 返回的是字节数。
1 | len('中文') # == 2 |
Python 源文件的编码
- 文本编辑器应使用 UTF-8 without BOM
- 在源代码前加:
1 | #!/usr/bin/env python3 |
或者使用 ANSI 编码,然后加上 #-*- coding:ansi -*-。默认为 UTF-8。
格式化字符串
和 C 的 printf() 一样,Python 也支持格式化字符串,也是使用 %,用法也差不多。但是格式略有不同。
1 | > 'Hello, %s' % 'world' |
格式化字符串和参数中间由 % 隔开。和记一下就行。有意思的是,如果你不太确定应该用什么,%s 永远起作用,它会把任何数据类型转换为字符串。
另一种形式是用字符串的成员函数 format(),把一个字符串的 {0}、{1}等,用参数来一一替换得到一个新的字符串。
1 | > 'Hello, {0}, 成绩提升了 {1:.1f}%'.format('小明', 17.125) |
除此之外,还支持以下类似 shell 的形式:
1 | name = 'World' |
还能支持居中、左对齐、右对齐:
1 | value = 'hi' |
输出如下:
1 | .hi . |
字符串函数
函数名|作用
-|-|-str.lower()|全大写str.upper()|全小写str.capitalize()|首字母大写str.title()|每个单词的首字母大写str.swapcase()|交换大小写len(str)|长度str.startswith(str)|返回 True 或 Falsestr.endswith(str)|返回 True 或 Falsestr.find(str)|返回出现的第一个位置,如不存在返回 0str.count(str)|计数出现次数str.strip()|去掉空白字符str.lstrip()|去掉左边的空白字符str.rstrip()|去掉右边的空白字符str.replace(str, str)|替换字符串str.rjust(int, str)|添加 str 以使右对齐至 int 个空格str.rjust(int, str)|添加 str 以使左对齐至 int 个空格
前面各类型的转换
字符、数字(ASCII 码)间的转换
单个字符和对应的 ASCII 码的转换可以使用 ord() 和 chr() 函数。
1 | ord('A') # == 65 |
还可以直接用八进制、十六进制写 str:
1 | '\u4e2d\u6587' # =='中文' |
字符串、实数间的转换
这种类型转换和 C++ 类似,把类型看作一个函数,如 int(),str()。
使用 str() 即可把 int 或 float 转为 str;
使用 int() 可以把 float(和 C 一样,向 0 取整)和 str(要求是能转化为整数的字符串)转为 int。
使用 float() 可以把 int 和 str(要求是能转化为实数的字符串)转化为 float。
1 | str(123.0) # = '123.0' |
布尔值
True, False 大小写敏感
print(True) 输出 True(而非 C 的 1)。
布尔运算:and,or,not
位运算
位运算: &,|,^,~,>>,<<
注意无论正负,进行右移 >> 操作都等价于除以 $2^n$ 后向下取整。参见整数的上限。
&&,||,!:不存在的
空值
空值是 Python 里一个特殊的值,用 None 表示。None 不能理解为 0,因为 0 是有意义的,而 None 是一个特殊的空值。如输出没有返回值的函数的返回值,会输出 None:
1 | def foo() |
其他数据类型
此外,Python 还提供了列表、字典等多种数据类型,还允许创建自定义数据类型.
列表 list
和 C++ STL 的 list 不同,Python 的 list 实际上不是链表,是可变长度的数组(元素是指针,类似于 C++ STL 的 vector<void *>,所以可以不同类型的变量混合存储)。因此,list.insert(index, elem) 和 list.pop(index) 是 O(n) 时间复杂度的。
list 定义
list 内可存不同类型,可以嵌套 list。
1 | classmates = ['Michael', 233 , "Tracy"] |
如何初始化一个大小为 100,元素全为 0 的 list 呢?
1 | newlist = [0] * 100 |
没错——
Python 的列表居然支持乘法!!!!这也太香了!
但是这种语法有陷阱——如果想要建立二维 list,以下语法是不行的:
1 | list2d = [[0] * 10] * 100 |
当你想要编辑第二行第二列个元素时,执行 list2d[1][1] = 1 后,会发现第二列的所有元素都变成了 1!
究其本质,是上面所说的,元素是指针,[[0] * 10] * 100 的外层 list 的 100 个元素实际上是指向了同一个 list。
解决方案有三个:
一是在外层老老实实的迭代:
1 | list2d = [] |
二是使用后面才会学到的列表生成式:
1 | list2d = [ [0 for i in range(10)] for j in range(100) ] |
三是使用 numpy.zeros
1 | import numpy as np |
list 成员函数
| 函数名 | 函数用法 |
|---|---|
len(classmates) |
列表中元素个数 |
classmates[0] |
第一个元素 ‘Michael’ |
classmates[3] |
返回 IndexError |
classamte[-1] |
返回最后一个元素(等价于classmate[2]) |
classmate[0:2] |
返回子列表,其元素在 classmate 的下标范围为 [0,2),详见切片 |
classmate[-3:0] |
返回最后三个元素组成的子列表,详见切片 |
classmates.append('Adam') |
向末尾追加元素(类似于 C++ std::vector::push_back()) |
classmates.insert(index, 'Jack') |
在索引号为 index 的位置前插入元素(O(n) 时间复杂度) |
classmates.pop() |
删除末尾的元素 |
classmates.pop(index) |
删除索引号为 index 的元素(O(n) 时间复杂度) |
list 和 str
C 中,字符串是字符数组 char[]。
Python 中虽然二者是不同的类型,但是可以互通。
str 到 list 直接类型转换就好了。而 list 到 str 则需要使用 join 函数。
1 | > list('abc') |
元组 tuple
元组这翻译怪怪的,可是谁叫 n-tuple 翻译过来是 n 元组呢
相当于是 list 的常量版本,一旦初始化就不能修改。但是可以使用 []。
1 | > classmates = ('Michael', 'Bob', 'Tracy') |
一元组要在 ) 后加 , 以示和括号表达式的区分。
字典 dict
Python 内置了字典:dict 的支持,dict 全称dictionary,在其他语言中也称为 map,使用键-值(key-value)存储,具有极快的查找速度。
查找和插入的速度极快,不会随着key的增加而变慢;
需要占用大量的内存,内存浪费多。
看到这里,其实已经猜到 dict 的实现是 hashmap 了。查了一下,果然是的。
定义
1 | d = {'Michael': 95, 'Bob': 75, 'Tracy': 85} |
对同一个键进行存入,会直接覆盖原先的值。
访问
访问:d['Adam'],(返回 67)。如果不存在键,则返回 KeyError。
如果要查询是否存在,可以使用 if 'Adam' in d。
dict 的 key
dict 的 key 要求是不可变的量,如整数、字符串、tuple。而 list 则不可以。若强行作为 key, 会返回 TypeError: unhashable type: 'list'。
变量
和 C 一样,变量名必须是大小写英文、数字和 _ 的组合,且不能用数字开头。
赋值过程和 C 一样。
1 | a = 1 |
Python (基本数据类型?)变量不需要初始化,且同一个变量可以反复赋值,而且可以是不同类型的变量。这种被称为 动态语言,反之为静态语言,如 C,Java。
查询、判断变量类型
查询类型使用 type():
1 | type(123) |
判断类型使用 isinstance():
1 | isinstance(123,int) |
常量
对基本数据类型,Python 没有常量。
习惯上,使用全大写命名来指代常量。
流程控制
条件判断(if)
if 中没有括号,判断条件后要加:。
貌似需要加缩进之前,前一个语句都需要加 :。这是个规律吧。
1 | age = 20 |
if 后还可以加 else,elif。
1 | elif age < 0: |
“三目运算符”
C / Java 中有很好用的三目运算符:
1 | printf("%s", value == true ? "Yes" : "No"); |
Python 没有三目运算符,但是 if 也可以用一行做到类似的功能:
1 | print("Yes" if value == True else "No") |
循环
不精准的测试了一下,在我的 i7-6600U 下,以下代码大概要 10s:
1 | n = 0 |
可以粗略得出,python 的整数加法计算次数约为 1e6 左右,为 C++ 的 1/1000。(C++ 相关测试可见我的另一篇博客:C++ 基本计算的速度)。这只是一个没有感情的测试,不存在说 Python 慢就是垃圾的意思
for … in …
在 list 用 for
类似于 C++ 的 for(int : vector<int>),Python 可以使用 for <variable> in <list/tuple>:
1 | names = ['Michael', 'Bob', 'Tracy'] |
用 range 生成序列
而如果是整数等差序列,可以使用 range(start, stop[, step]) 函数,然后转为 list。[start, stop) 左闭右开。左闭右开可以按 C++ 常用的 for (i = start; i < stop; i += step) 来记。
如果是倒序的话,只要令 step 为负数即可。依旧是 start 闭,end 开(即 for (i = start; i > stop; i += step))
以下四种语法等价。
1 | list(range(5)) |
就可以愉快的 for i in list(range(5)): 了。
顺便一提,range 可以类型转换为 list。
在其他数据结构用 for
str,dict也是可迭代的。默认情况下,dict 迭代的是 key,但也可以迭代 key 和 value。
1 | d = {'a': 1, 'b': 2, 'c': 3} |
判断某对象是否可迭代,可使用 Iterable 类型。
1 | from collections import Iterable |
如果想要实现下标循环,可以用 emumerate() 把 list 变为 索引-元素对。
1 | for i, v in enumerate(['A', 'B', 'C']): |
同时引用两个变量是很常见的。
1 | for x, y in [(1, 1), (2, 4), (3, 9)]: |
while
和 if 一样。
1 | sum = 0 |
break 和 continue
和 C 语言一样。
1 | n = 0 |
函数
调用函数
简单,不多说。
1 | abs(100) # = 100 |
定义函数
函数前写 def,后面全部缩进。
1 | def my_abs(x): |
如果函数保存在 abstest.py 中,需要使用 from ... import ... 来引入函数。
1 | from abstest import my_abs |
import 的更复杂用法会在模块一节中详细介绍。
空函数 pass
如果函数定义留空会报错,此时可以使用 pass 来占位。(pass 和 return 是不一样滴!!!)
1 | def nop(): |
在条件分支中也可以使用 pass:
1 | if age >= 18: |
函数类型检查
Python 解释器只进行参数个数的检查,不进行参数类型的检查。需要自己使用 isinstance(variable, tuple of type) 手动检查。
注意 isinstance() 中 int 和 float 是不一样的(本来也是,str float int 之间随便转,他们也不是一个东西)。
1 | def my_abs(x): |
还用到了 raise 返回错误。要多练习一下。
函数练习
给定 $a,b,c$,解一元二次方程$ ax^2 + bx + c = 0$:
1 | import math |
函数参数
其中 3.-5. 有点硬核,先不管。用到再学。
1. 必选参数
即最普通的用法。
1 | def pow(x, n): |
2. 默认参数
和 C++ 一样,Python 也有默认参数。
1 | def pow(x, n = 2): |
声明参数时必选参数在前,默认参数在后,否则会导致编译错误。
调用函数时,默认参数可以不写,也可以按顺序给出。如无法按顺序给出(第一个默认参数为默认,但第二个不默认),可以指明变量名。
1 | enroll('Adam', 'M', city='Tianjin') |
坑
默认参数要指向不变对象!!
如:
1 | def add_end(L = []): |
究其本质,还是 [] 只是一个指针。
用 add_end(L = None) 即可解决。
1 | def add_end(L = None): |
3. 可变参数
如果不使用可变参数,传入 list 或 tuple 时就需要先组装。
1 | def calc(numbers): |
如果使用可变参数,就不用组装了,也可以调用 0 个参数。在变量名前面加 * 即是可变参数。而调用 list 或 tuple 时也可以加一个 *。
1 | def calc(*numbers): |
print() 也是使用这种形式。
4. 关键字参数
上面是把所有参数变为 tuple,而这里是把额外的 0 个或 n 个参数变为 dict。
1 | def person(name, age, **kw): |
这有什么用呢?比如,在 person 函数里,我们保证能接收到 name 和 age 这两个参数,但是,如果调用者愿意提供更多的参数,我们也能收到。
试想你正在做一个用户注册的功能,除了用户名和年龄是必填项外,其他都是可选项,利用关键字参数来定义这个函数就能满足注册的需求。
1 | extra = {'city': 'Beijing', 'job': 'Engineer'} |
而传 dict 进去也是,加 ** 就可以了。
但是请注意,这种用法中,不管是传很多组,还是直接传 dict,Keywords 必须为 string 名。诸如 1=one,'one'=1 都不能作为关键词参数传进函数。而传进去的 Keywords,会加引号。
5. 命名关键字参数
关键字参数中,对参数名没有直接限制;如果需要限制名字,可以使用命名关键字参数。
1 | def person(name, age, *, city, job): |
这样,我们只接受 city 和 job,其他参数会被忽略。
参数组合
Python 定义函数,可以按顺序组合使用 必选参数、默认参数(y=1)、可变参数(*kw,组成 tuple)、命名关键字参数(*,x,y)、关键字参数(**kw,组成 dict)。
但是不要使用太多的组合否则代码就太难理解了。
高级特性
这部分和 C 差异有点大,因此先水过去,等用到的时候再看。
切片 slice
现在有一个 list L = list(range(20))。使用切片可以快速得到其子序列。
使用 L[begin:end] 可以得到 L 下标在 [begin, end) 范围内的数据。注意:
- begin 和 end 可以按规定使用负数。
- begin 和 end 可以省略,缺省值为 begin = 0, end = 末尾下标+1。
- 若 end > begin,则返回空 list
[]。
slice 也可以使用于 tuple,str 等支持切片的功能。
另外还可以用 L[start:end:step] 指定 step 大小。每隔五个取一个就是 arr[::5]。
1 | a=list(range(100)) |
del 语句
list 自带了 append 和 insert,分别是在 list 最后追加元素、在中间插入元素。也可以使用 del 删除元素。
1 | a = [-1, 1, 66.25, 333, 333, 1234.5] |
迭代 iteration
其实就是前面讲了的 for … in … 语法。
列表生成式
这个东西可以把 list(或可迭代的数据类型)中的元素通过自定义的映射函数生成新的 list 或 tuple。还可以配合 if、两层 for。
1 | [x * x for x in range(1, 11)] |
另外还可以使用两个变量。
1 | d = {'x': 'A', 'y': 'B', 'z': 'C' } |
生成器 generator
列表生成式是新建一个链表,而生成器是保存映射关系,需要时再进行计算。
第一种方法
用法仅仅把列表生成式的 [] 改为 ()。
1 | g = (x * x for x in range(10)) |
我们可以反复使用 next() 获得 generator 的下一个返回值。
1 | next(g) |
当然可以使用 for 循环。
第二种方法:yield
输出 Fibonacci 数的前 max 位,可以使用一个函数:
1 | def fib(max): |
上述程序会一次性计算完前 max 位。
把上面的程序改为 generator。
学不会学不会,感觉也不常用。留个坑吧。
https://www.liaoxuefeng.com/wiki/1016959663602400/1017318207388128
函数式编程
函数式编程就不仅仅是单纯的函数体、调用函数了了,还有更多的东西,比如类似于 C/C++ 函数指针的功能等等。
将函数赋给变量
其实就是将函数指针赋给了变量。
1 | abs(-10) |
理所应当地,也可以把函数作为函数的参数。
1 | def add(x, y, f): |
下面是一些应用:map、reduce、filter、sorted。
map
python 的 map 其实类似于对一个 list/tuple 的每个元素使用函数 f,得到一个新的 list(实际上是把 map 类型转换为了 list),具体操作如下:
1 | r = map(f,list(range(10))) |
显然该操作也可以使用循环,但是 python 追求的就是极致的简洁。
reduce
reduce() 函数会对参数序列中元素进行累积。
函数将一个数据集合(链表,元组等)中的所有数据进行下列操作:用传给 reduce 中的函数 function(有两个参数)先对集合中的第 1、2 个元素进行操作,得到的结果再与第三个数据用 function 函数运算,最后得到一个结果。
–Python reduce() 函数| 菜鸟教程
reduce 和 map 一样,也接受两个参数,第一个是 f(x,y),第二个是一个 list/tuple,作用类似于叠加:
1 | def f(x,y): |
也可以尝试手写一个将存有 digit 的 list 转为 int:
1 | from functools import reduce |
函数式编程练习
使用 reduce 和 map 手写一个 str2int 函数,将字符串转为整数。
这也说明,字符串可以当做字符的 list 来用。
1 | def str2int(_str): |
filter
这个函数有两个参数,第一个是返回 True 或 False 的函数 f,第二个是一个 list。 filter 函数返回 list 中 f(x) 为真的所有 x。
1 | def is_odd(n): |
sorted
sorted 函数返回原 list/tuple 被排序以后的 list/tuple(而不是直接在 list/tuple 上修改)。
1 | arr=[3,1,8,4,5] |
可以用一个函数作为 key 参数指定排序的依据。可以用 Reverse=True 参数使降序排列。
注意这个函数不是类似于 C++ sort 所需的返回两个元素的大小的 bool 值,而是返回一个元素的大小,如可使用 abs 函数:
1 | '-'.join(['a', 'b', 'c']) |
对字符串 list 可以直接以字典序排序:
1 | arr3=['banana', 'anana', 'nana', 'ana', 'na', 'a'] |
注意在 Python 中,Z<a,如果想要忽略大小写,可以把 key 设定为 str.tolower 函数。
1 | sorted(['bob', 'about', 'Zoo', 'Credit'], key=str.lower, reverse=True) |
函数作为返回值
我们可以在函数内部创建一个函数(又名嵌套函数),然后返回。刚看到这里,说实话不知道这个有什么意义。
1 | def lazy_sum(*args): |
1 | f = lazy_sum(1, 3, 5, 7, 9) |
多次调用 lazy_sum 时,会在不同位置创建多个函数,虽然他们本质是一样的。
1 | f1 = lazy_sum(1, 3, 5, 7, 9) |
对于输入或输出是函数的函数,我们称为这种函数叫高阶函数。
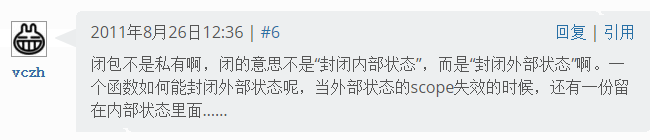
闭包 closure
廖雪峰的博客这一部分讲的有点糙,没看懂。后来又去看了 知乎,大概懂了。
首先说一句,CS 的闭包和数学的闭包完全没有关系!参考:https://www.zhihu.com/question/20504785,有人提到 SICP里第二章注释6
The use of the word “closure” here comes from abstract algebra, where a set of elements is said to be closed under an operation if applying the operation to elements in the set produces an element that is again an element of the set. The Lisp community also (unfortunately) uses the word “closure” to describe a totally unrelated concept: A closure is an implementation technique for representing procedures with free variables.
上面这个 unfortunately 笑死我了。
在计算机科学中,闭包(Closure)是词法闭包(Lexical Closure)的简称,是引用了自由变量的函数。这个被引用的自由变量将和这个函数一同存在,即使已经离开了创造它的环境也不例外。所以,有另一种说法认为闭包是由函数和与其相关的引用环境组合而成的实体。
这段说的很对但是对于萌新来说可能讲的不像是人话
1 | def adder(x): |
第二次还是没大看懂,以后再来看吧。
lambda 函数
lambda 函数就是匿名函数。一般用于函数比较简短的情况。
1 | def is_odd(x): |
对于这个简短的的 is_odd 函数,写了不仅让代码多了两行(不考虑那种按代码行数计算工资的程序员),还多占用了一个 is_odd 名字。其实我们完全可以用匿名函数来解决:
1 | L=range(10) |
也就是说,lambda x : x % 2 == 1 这是一个函数,完全等价于我们在第一段函数定义的 is_odd(x)。
当然,当 lambda 函数变复杂时,还是推荐使用 is_odd(x) 这样的常规函数。
装饰器 decorator
装饰器是什么?在调试程序的时候,可能需要在函数的前后输出相关信息。此时,我们就可以对函数进行“装饰”,使得运行该函数时,会输出相关信息。
那么,如何实现呢?我们定义一个 wrapper 函数,他做的事情是在某函数开始时输出、在函数结束时再输出。
如果我们还想要写一个通用 wrapper 函数对于所有函数都生效,那么 wrapper 执行的函数应该作为一个参数。作为谁的参数呢?
在 Python 的装饰器里,我们定义一个 wrapper 函数,其输入、输出和 func 完全一致,这个函数做的事,就是调用 func 函数,并在调用 func 前后做一些事情(输出、计时等等)。
而指定 func 的办法,是我们再定义一个 log 函数,这个函数输入 func,这个函数的操作是定义并返回调用了 func 的 wrapper。说了这么多大概晕了,那么直接上代码吧。
1 | def log(func): |
有了上面的代码,我们可以在需要装饰的函数前(示例为 test)加上 @log。
1 |
|
先不说 @log 的原理,我们先来调用一下 test 函数。把上面的两段代码整合在一起,然后调用 test。
1 | def log(func): |
输出如下
1 | starting executing function test |
如果把 @log 去掉,那么程序只会输出 150。也就是说,我们成功地在 test 执行前后进行了计时、输出。
再回来说 @log 的原理:在定义 test 函数前加 @log,程序会在 test 定义完以后,执行 test=log(test)。配合 log 函数的定义就能做到前面所述的效果。具体过程如下:
- 定义原
test - 把
test作为参数给log。log创造了wrapper(*args, **kw)函数,该wrapper函数执行test(*args, **kw)并返回test的返回值
test=log(test)。将创造的wrapper函数改名为test。- 以后调用
test,执行的实际上是在log(test)中定义的wrapper。
大致原理如上。
但是还有一点问题,在以后我们调用 test.__name__ 时,由于此时的 test 实际上是 wrapper,所以返回就有点问题。
解决方法可以在 wrapper 定义中加一句 wrapper.__name__ = func.__name__。但是推荐直接调用 Python 自带的装饰器。
1 | import functools |
完整代码如下:
1 | import time |
在面向对象(OOP)的设计模式中,decorator 被称为装饰模式。OOP 的装饰模式需要通过继承和组合来实现,而 Python 除了能支持 OOP 的 decorator 外,直接从语法层次支持 decorator。Python 的 decorator 可以用函数实现,也可以用类实现。
decorator 可以增强函数的功能,定义起来虽然有点复杂,但使用起来非常灵活和方便。—— 廖雪峰的 Python 教程
模块
在 Python 中,一个 .py 文件就称之为一个模块(Module)。
1 | import sys |
按第一行导入 sys 模块后,我们就有了变量 sys 指向该模块,利用访问 sys 这个变量的成员(如 sys.argv),就可以访问 sys 模块的所有功能。也可以使用别的变量名,比如后面一句,就用 np 指向了 numpy。
顺便,在 Python 环境中(即 >>> 中)貌似没法直接运行脚本,如果需要调用脚本中的函数,应该当做模块一样,import filename 然后 filename.function_name() 来调用。
虚拟环境和包
应用程序有时需要特定版本的库,因此某些时候不能安装最新的包,甚至不同应用程序需要不同的 Python 安装程序。
因此,可以建立多个 Python 虚拟环境,每个虚拟环境用一套软件。
建立虚拟环境并激活的方法如下:
1 | python3 -m venv tutorial-env # 建立虚拟环境 |
将该环境下安装的包导出为 requirements.txt、从导出文件建立环境;
1 | freeze > requirements.txt # 导出为 requirements.txt |
