系列目录
前言
当时入门的时候没找到系统的 Spring Boot 入门教程,干脆自己写了一个。
不过后来发现还是有优质教程的,是自己没怎么找了:
雷丰阳2021版SpringBoot2零基础入门springboot全套完整版(spring boot2)_哔哩哔哩_bilibili
Spring Boot 参考文档(英文,Chrome 翻译效果还可以)
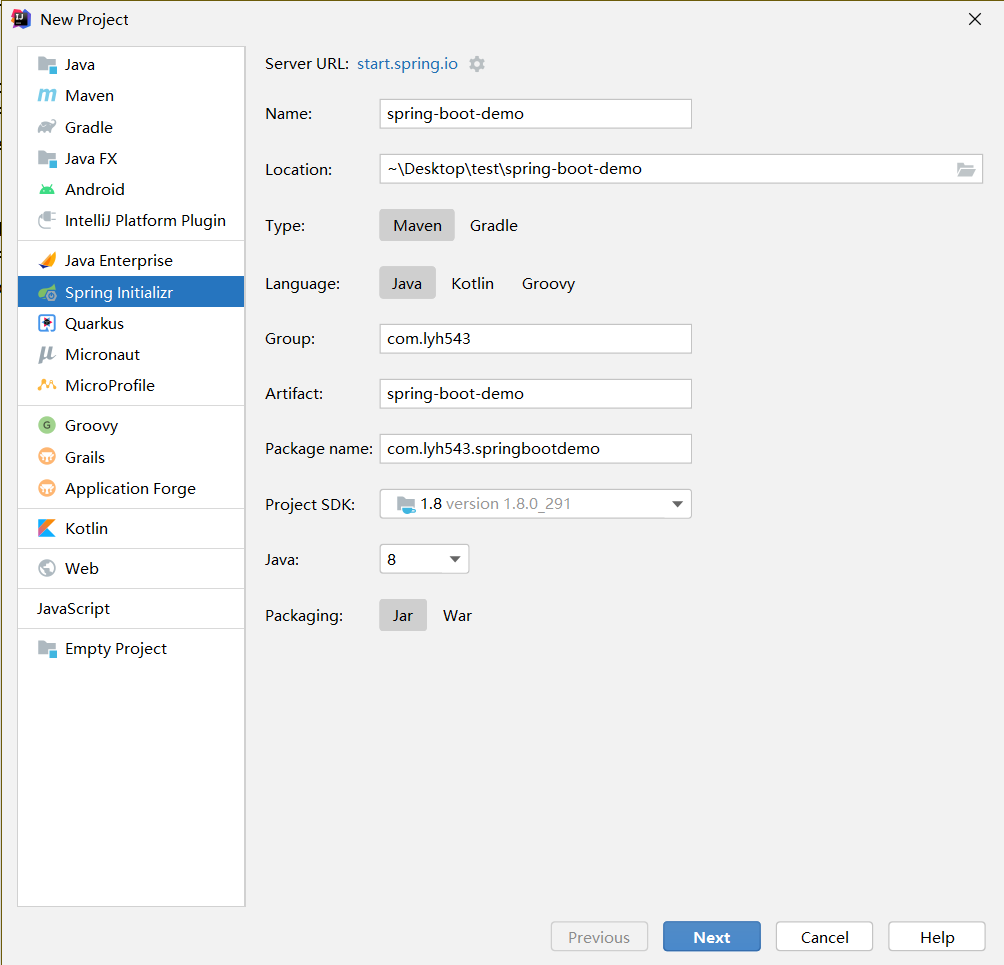
Idea 创建项目
Spring Initializr
是组里要求用 JDK 1.8 的(我也很无奈啊),个人开发可以选择更新版本的 JDK。
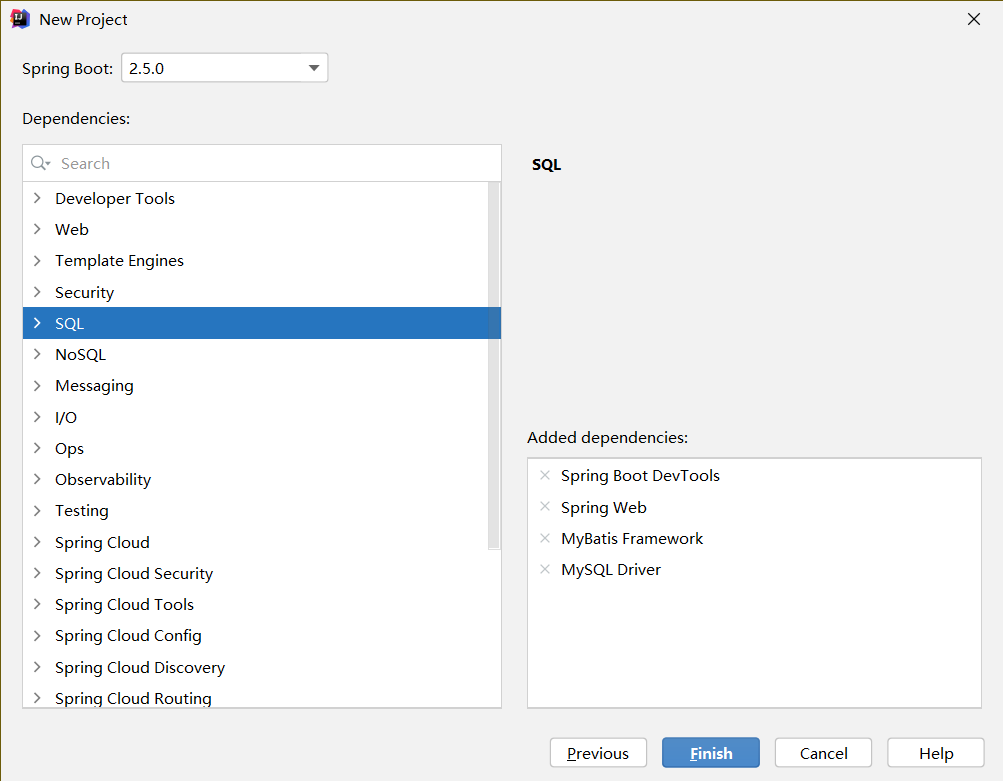
选择依赖
如果创建项目、运行以后自动停下来了,可能是没有添加 Spring Web 依赖。可以在 pom.xml 手动添加以下依赖:
1
2
3
4
| <dependency>
<groupId>org.springframework.boot</groupId>
<artifactId>spring-boot-starter-web</artifactId>
</dependency>
|
application.yml
因为创建项目的时候写了数据库,所以即使不用数据库,也要给定 spring.datasource.url。
这里使用更易读的 yaml 替代 properties,所以如果 Idea 创建了 src/main/resources/application.properties,需要先删掉,然后创建 src/main/resources/application.yaml,添加以下内容:
1
2
3
4
5
6
7
8
| server:
port: 8080
spring:
datasource:
url: jdbc:mysql://127.0.0.1:3306/springbootdemo?useUnicode=true&characterEncoding=utf8&autoReconnect=true&useSSL=false&serverTimezone=Asia/Shanghai
username: root
password: 123456
driver-class-name: com.mysql.jdbc.Driver
|
Hello world!
这里不多讲解 Spring Boot 的工作原理,只讲如何创建一个 Spring Boot 应用。工作原理什么的,可以成功部署一个 Spring Boot 应用后再重新学习,这样就不至于因为东西太多,反而弄得头大。
Idea 还帮我们编写好了 com/lyh543/springbootdemo/SpringBootDemoApplication.java,所以不需要动它,只需要直接编写页面的 Controller。
1
2
3
4
5
6
7
8
9
10
11
12
13
|
import org.springframework.web.bind.annotation.GetMapping;
import org.springframework.web.bind.annotation.ResponseBody;
import org.springframework.web.bind.annotation.RestController;
@RestController
public class RootController {
@GetMapping(value = "/api")
public String helloWorld() {
return "Hello, world!";
}
}
|
启动 Spring Boot:
1
2
3
4
5
6
7
8
9
10
11
12
13
14
15
16
17
18
19
20
21
22
23
| . ____ _ __ _ _
/\\ / ___'_ __ _ _(_)_ __ __ _ \ \ \ \
( ( )\___ | '_ | '_| | '_ \/ _` | \ \ \ \
\\/ ___)| |_)| | | | | || (_| | ) ) ) )
' |____| .__|_| |_|_| |_\__, | / / / /
=========|_|==============|___/=/_/_/_/
:: Spring Boot :: (v2.5.0)
2021-06-07 14:42:06.691 INFO 14280 --- [ main] c.l.s.SpringBootDemoApplication : Starting SpringBootDemoApplication using Java 1.8.0_291 on yanhuiliu-PC0 with PID 14280 (C:\Users\yanhuiliu\Desktop\test\spring-boot-demo\target\classes started by yanhuiliu in C:\Users\yanhuiliu\Desktop\test\spring-boot-demo)
2021-06-07 14:42:06.693 INFO 14280 --- [ main] c.l.s.SpringBootDemoApplication : No active profile set, falling back to default profiles: default
2021-06-07 14:42:07.186 WARN 14280 --- [ main] o.m.s.mapper.ClassPathMapperScanner : No MyBatis mapper was found in '[com.lyh543.springbootdemo]' package. Please check your configuration.
2021-06-07 14:42:07.403 INFO 14280 --- [ main] o.s.b.w.embedded.tomcat.TomcatWebServer : Tomcat initialized with port(s): 8080 (http)
2021-06-07 14:42:07.409 INFO 14280 --- [ main] o.apache.catalina.core.StandardService : Starting service [Tomcat]
2021-06-07 14:42:07.409 INFO 14280 --- [ main] org.apache.catalina.core.StandardEngine : Starting Servlet engine: [Apache Tomcat/9.0.46]
2021-06-07 14:42:07.466 INFO 14280 --- [ main] o.a.c.c.C.[Tomcat].[localhost].[/] : Initializing Spring embedded WebApplicationContext
2021-06-07 14:42:07.466 INFO 14280 --- [ main] w.s.c.ServletWebServerApplicationContext : Root WebApplicationContext: initialization completed in 737 ms
2021-06-07 14:42:07.938 INFO 14280 --- [ main] o.s.b.w.embedded.tomcat.TomcatWebServer : Tomcat started on port(s): 8080 (http) with context path ''
2021-06-07 14:42:07.966 INFO 14280 --- [ main] c.l.s.SpringBootDemoApplication : Started SpringBootDemoApplication in 1.702 seconds (JVM running for 2.346)
2021-06-07 14:42:07.968 INFO 14280 --- [ main] o.s.b.a.ApplicationAvailabilityBean : Application availability state LivenessState changed to CORRECT
2021-06-07 14:42:07.971 INFO 14280 --- [ main] o.s.b.a.ApplicationAvailabilityBean : Application availability state ReadinessState changed to ACCEPTING_TRAFFIC
2021-06-07 14:42:14.037 INFO 14280 --- [nio-8080-exec-2] o.a.c.c.C.[Tomcat].[localhost].[/] : Initializing Spring DispatcherServlet 'dispatcherServlet'
2021-06-07 14:42:14.038 INFO 14280 --- [nio-8080-exec-2] o.s.web.servlet.DispatcherServlet : Initializing Servlet 'dispatcherServlet'
2021-06-07 14:42:14.039 INFO 14280 --- [nio-8080-exec-2] o.s.web.servlet.DispatcherServlet : Completed initialization in 1 ms
|
访问 localhost:8080,看到 Hello world!。
热更新
热更新需要安装 spring-boot-devtools,不过创建项目的时候已经安装过了:
如果是idea,需要改以下两个地方:
- 勾选
File > Settings > Compiler > Build Project automatically
- 勾选
ctrl + shift + alt + / > Registry > compiler.autoMake.allow.when.app.running
不过还是要写完以后 10s 左右才会热更新,有点慢。
Stack Overflow 上给出了另外一种解决办法,把 Build 绑定到 Ctrl + S。每次写完以后 Ctrl + S 一下就会立即 Build,Spring Boot 检测到变化后就会在 1s 之后热部署。
最后更新时间: